Getting creative with Cupboard parts

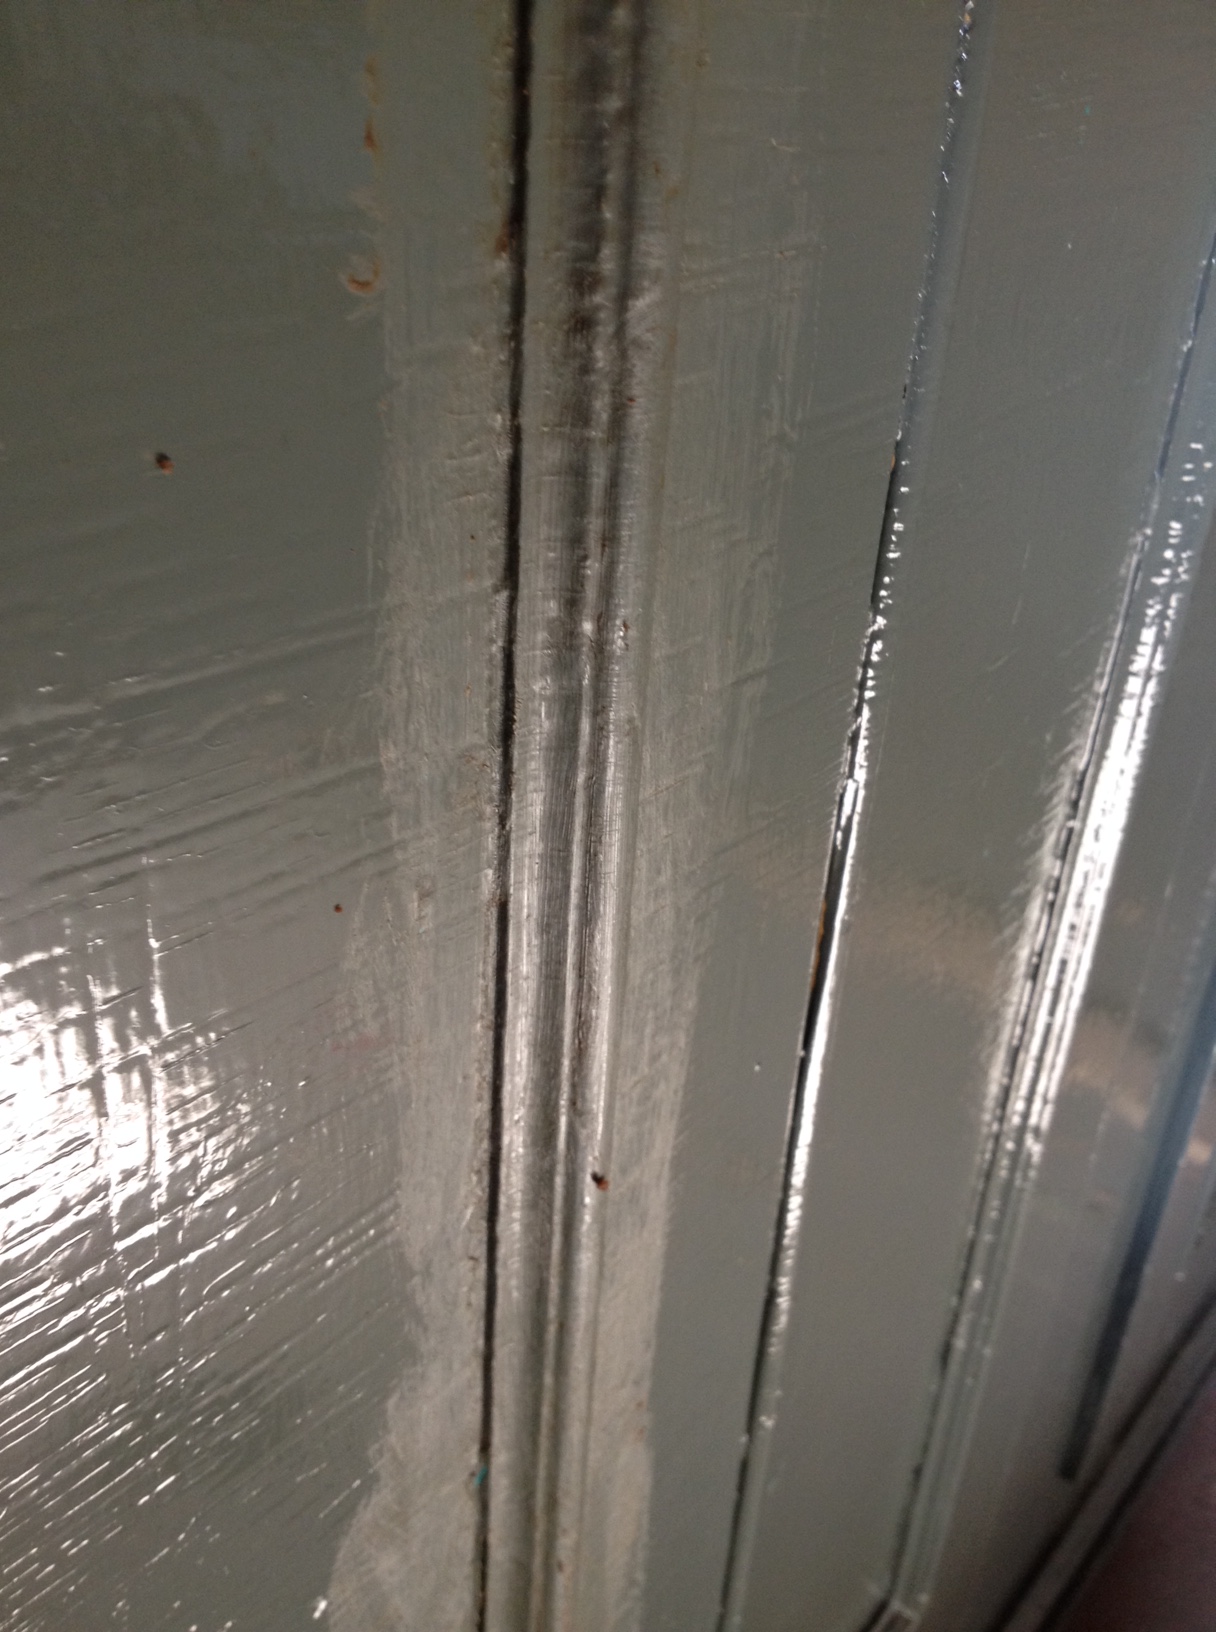
In the 1980’s it became trendy to put your t.v. and/or stereo system in a cupboard to tuck them away when you weren’t using them.  Therefore the demand for antique storage cupboards continued to grow throughout the 1980’s, to the point where the supply could not meet the demand.   I would have a half dozen people looking for such an item and I was only able to bring back one or two from the picker’s I frequented in Quebec.  That’s when I started to look more closely at the out building, or out, out building that were the dealers “bone yards”.  Here, for a fraction of the cost of good cupboard, you could buy a good cupboard that had undergone some horrible mutation, such as being cut in half to make it possible to carry up the stairs to the attic where it was relegated to hold the out of season clothing.  Yes, it happened.  People would take a perfectly decent cupboard and buzz it right down the middle (as illustrated below). There were also cupboard faces or fronts, which had somehow lost their bodies, or in some cases were the front of a built-in which may have been saved when they tore down the house and the rest of the cupboard was lost.  There were also lots of doors, both in pairs, and singles, and good bodies of cupboards missing doors.  You name it.

So this situation combined with an interest in doing a little creative woodworking led me to buy a couple of likely candidates for restoration. I determined that I would do the work to bring them as close to their original glory as possible. Using period tools and materials, I replaced missing parts, and would either paint to match the rest of the cupboard, or if the paint as found was not original or particularly interesting I would repaint the whole cupboard to an appropriate for the period colour. cupbo1

Here we see a good before and after example  You can see that this nice large cupboard was run through right up the middle but the two halves retained all the important parts.  The doors, and side panels, hinges, etc.  It was easy enough to replace the bottom, top, and middle board, and then reproduce from old house trim an approximate and appropriate base and top trim.  Mending the back, top and bottom was pretty simple, and it was ready to paint.  There was no good colour under that lime green so I painted it using old flat oil paints of forest green and turkey red with a mustard yellow accent on the trim.  I then rubbed it down slowly and evenly with fine steel wool and paste wax until it had a slightly softened, or weathered look.cupbo2  
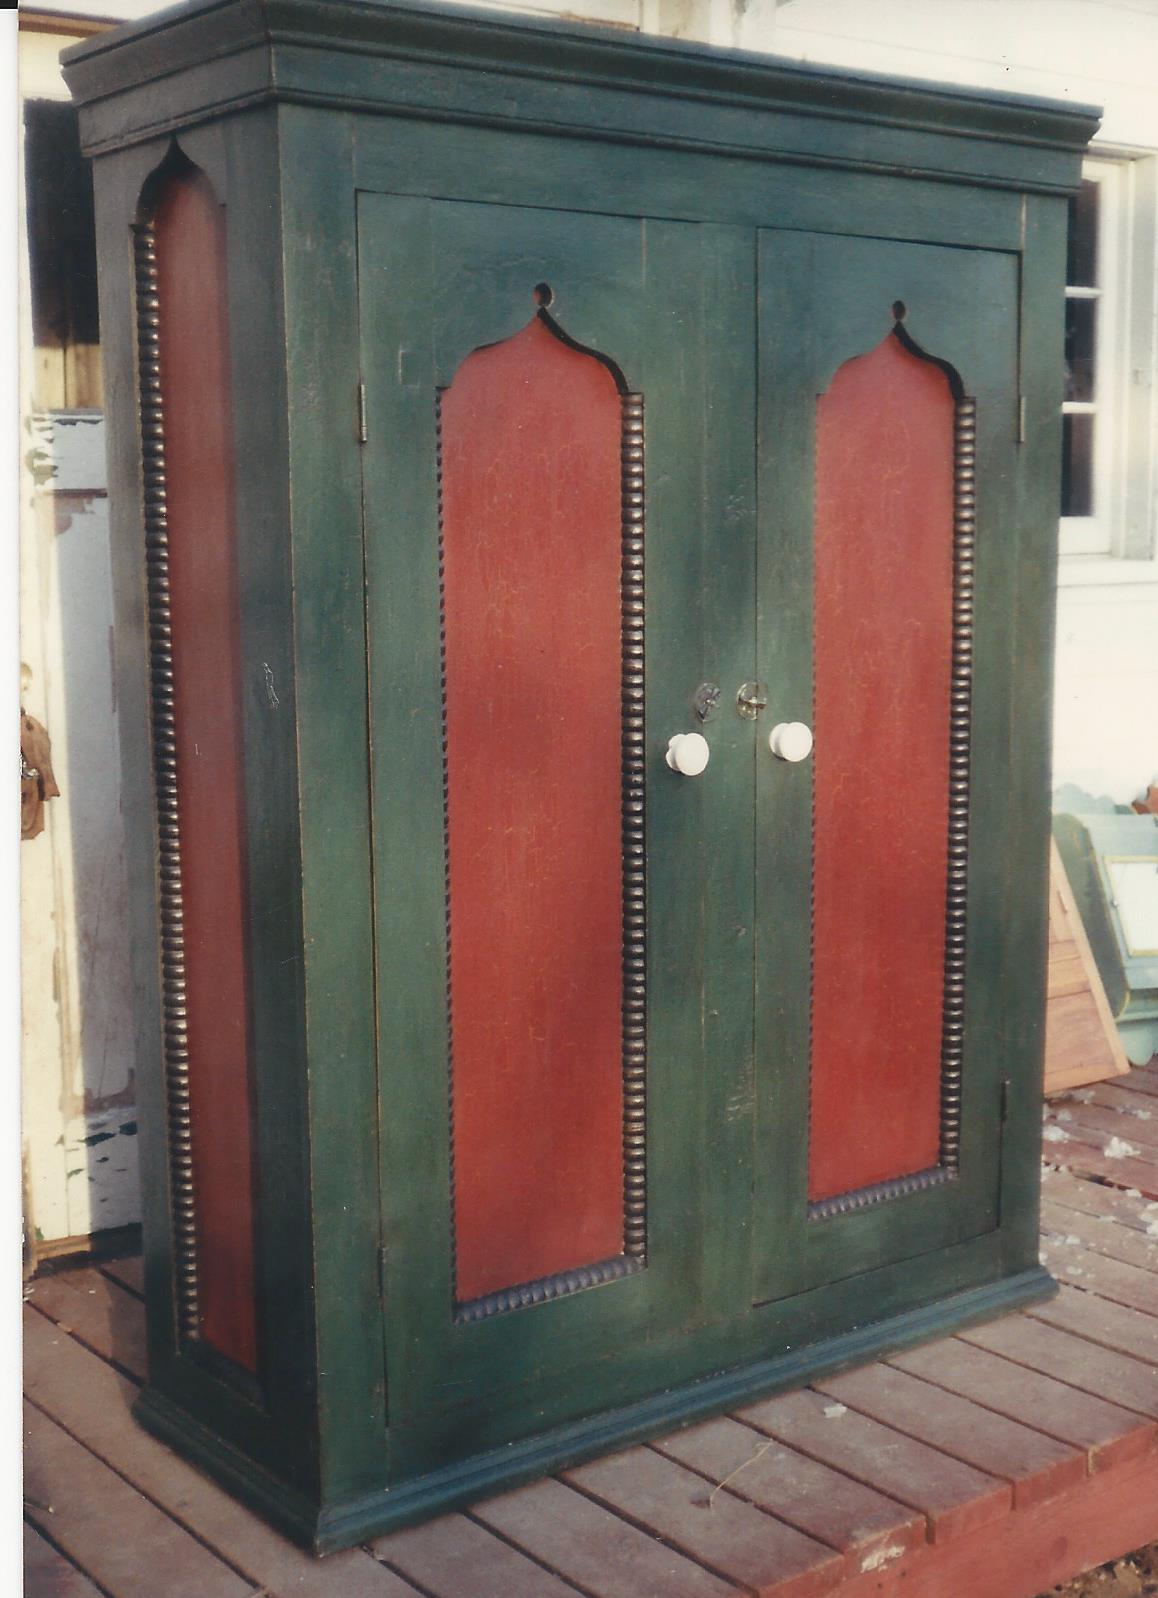
I wasn’t one for rubbing the heck out of the area around the knobs to try to approximate heavy wear.  To me this is always a dead giveaway.  My objective was to be as unobtrusive as possible. Add a couple of period china knobs and it was looking good.  I made it a point to tell potential buyers everything I had done to restore the cupboard and I priced them accordingly.  Some would prefer to wait for something original, but many were happy to have something that looked good, was less expensive and did the job.

On other occasions I would find a cupboard that essentially had good bones, but were otherwise lacking to some degree.  Below we have a before and after of just such a case.  I liked the high waist and form of this little flat back kitchen cupboard but the top shelving was ugly.  It also showed evidence that the haphazard arrangement of shelves on the right were added later and the shadow was still there on the left side where the original shelf had been.cupbo3  I took out the added selves, replaced the shelf where it had originally been, and added a wavy trim around the openings.  This I admit was an artistic conceit, but damn it does look cute.  There was nothing under the white so I painted it a robin’s egg blue and called it a day.cupbo4


cupbo5This little green and red cupboard was a special order for a customer who needed a narrow cupboard to hold his cd’s that would fit into a spot between two walls.  I found a suitable door and built the rest out of re-purposed 110 year old pine and house trim.


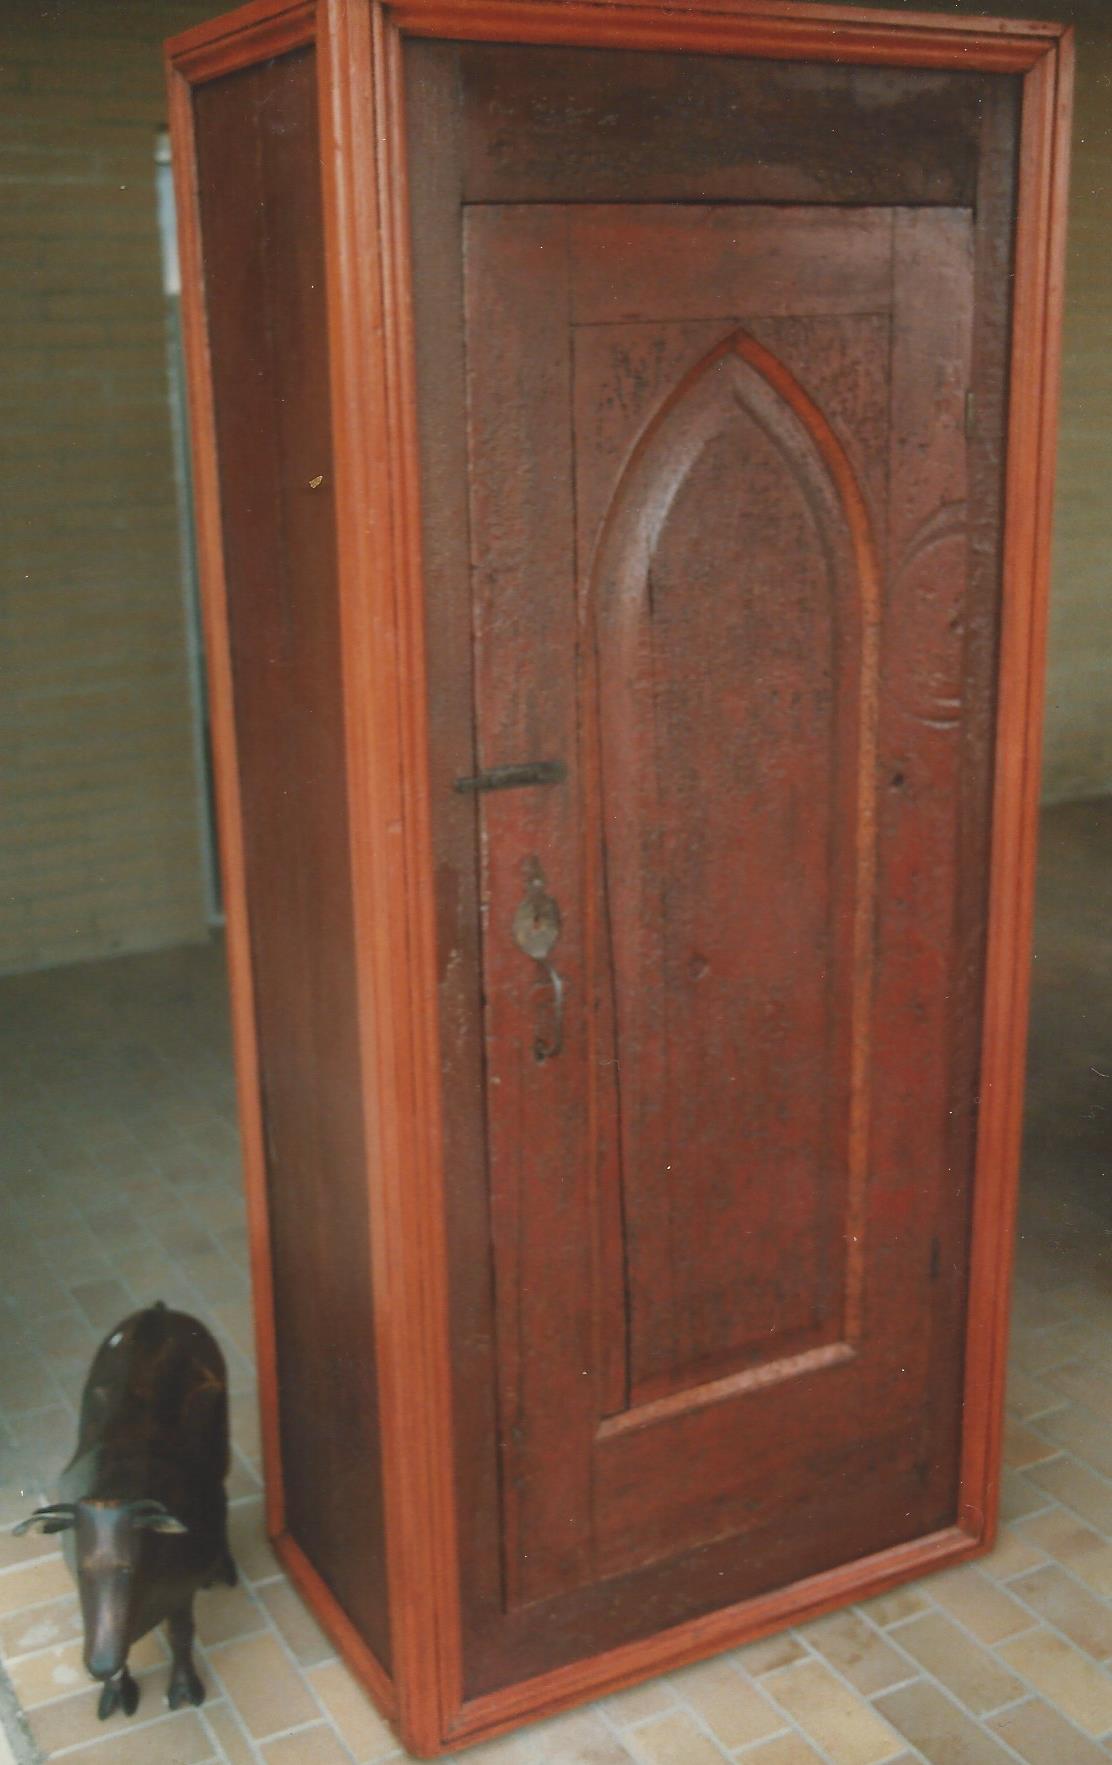
Finally, this cupboard is an example of finding a kick ass old Gothic door and housing it in something simple that more or less suited it, and by doing so turning  it into a useful piece of furniture.  I didn’t touch the original paint on the door, and made the rest of the paint complement the original.

I enjoyed occasionally doing this type of work for a few years while the market for such furniture was strong.  Mostly for the satisfaction of taking something that had originally been really nice, was screwed up, and then brought back to a useful existence.   After while I just got over it, and went back to dealing in all original pieces.  It was fun while it lasted.cupbo6

Repainting an antique cupboard in oil

before

before

On occasion, people will like the form and size of a painted cupboard, but can’t live with the colour.  Your options assuming the paint is not original which is when I would encourage people to learn to love it as it is or let someone who does own it, are to either strip it down and refinish the wood, strip it down and repaint it, or in the cases were the piece is in a stable old oil paint, to simply prepare the surface and repaint right over the last coat.  Done properly this approach can be the most natural of any of the processes, and is in fact what happens to many cupboards over the course of their lives anyway.  I imagine the scenario were someone decides the old cupboard just looks tired and doesn’t fit in anymore, and the most natural thing to do is to go out to the garage and grab a can of paint you like and away you go.  It’s currently fashionable to strip the cupboard and apply a “chalk paint”, and then rub and sand it down in an attempt to look like natural wear.  If this is the look you like, go for it, but I think in many cases it ends up looking unnatural.   Especially if a cupboard was made in the period after oil paint was invented around the turn of the 20th century, the most natural thing to happen would be for it to be painted in oil. Therefore, if your objective is to make it look good but not “messed with” your best approach can be to repaint in oil paint and then rub down the surface a bit to not have it look too new and shiny.  To my mind, this is the most natural and effective way to give a piece new life, and of course it is a lot less work that stripping it.

Witness here exhibit “A”.  A big old beast of a wardrobe from Quebec made about 1900 of an unattractive Ash wood which was probably painted white as soon as it was made.  On top of that original white, someone later has painted it cream with a flashy, vibrant blue for the panels and trim.   My customer loves the form but cannot live with the bright colour, so has asked me to paint it all in a mid grey which will fit in with the rest of her décor. She prefers that it be all of one colour so it blends in to the room.  She gives me a paint sample of the preferred colour.

Here in Canada they have decided that oil paint is dangerous and have taken it off the market, so you either take a trip to the states where they are still sensible and allow the sale of oil paint, or find some old stock (I’ve hoarded quite a bit of the stuff), or in this case use the only form of oil based paint still available here which is rust paint.  The paint store informed me that this too will soon be pulled from the market.  A pity because for one thing all latex “so called” floor paints are total garbage and should be banned.  Every time you drag something across latex paint it peals like a balloon and so is quite worthless.  This is the case as well if you use it on your cupboard and try to rub it down a bit to look aged and worn.  It just peels off and looks like garbage.   I much prefer the old original oil paints as you can get a less shiny surface, but the rust paint works in a pinch and you can tint it exactly as you wish.

cleaning the surface

cleaning the surface

The first step is to prepare the surface.  It must be clean and any loose paint removed.  Sometimes this requires some light sanding but in this case, all I did was to brush and rub it down completely with turpentine to remove the dirt and any wax that may have been applied. You can use paint thinner, but for a couple of dollars more I prefer the turpentine.  Do this in a well-ventilated area of course.  A garage on a nice day when you can have the door open and a fan going is perfect.  When it is completely rubbed down and clean you are ready to paint.

I thin the paint by about 20% with the turps.  I’ll even go thinner if I want a lot of the old paint to show through, but in this case, we want only small areas of the old paint to show.

Put an even coat over everything.   Then wait a day or so depending on the temperature to let it dry.  This is the slightly tricky part, because you want the paint dry, but to soften the gloss of the surface and wear it through slightly it is best if it is not completely hard set.  A bit of rubbing along the bottom of the side is a discreet place to test.

waxing with a stiff brush

waxing with a stiff brush

In the case of this cupboard, as the weather was warm it was ready to be rubbed down the next day.  It should be noted that you must have a temperature above 50 degrees Fahrenheit or the oil paint will take forever to dry.

Next, apply a thick coat of Min wax for dark woods over the entire piece using a stiff brush and fine 00 steel wool.  You will see that when you rub hard a bit of the paint will come off along the edges and where the under-paint is worn.  Take your time and work evenly. Do not attempt to rub through more vigorously around the knobs or in places you think should show more wear as this always becomes obvious. img_1626

If you rub evenly the paint will naturally come off a bit more in these places.  You will note that the dark wax lays in the little creases and accentuates them.  This slight dirtiness also gives the piece a more natural patina and softens the overall look.  Let the wax dry for a couple of hours and then give it a light buffing with a bit of burlap or an old wool sweater.  Not too much or it becomes shiny.

showing how wax dulls the surface

showing how wax dulls the surface

When this dries, you are done. The piece may still look a little shiny but let it be and nature will take its course.  Over the weeks and months, the surface will settle and age.  If you get it right, it’s a good way to bring new life to a piece without having it look done over.

after

after

Going further than Faux

green and orange "spool" table

It started innocently enough.  It was in the 80’s when we were either selling as found, or on occasion if the surface was bad, but the natural wood was good, we would strip and refinishing as was popular at the time.  One day we bought a small handmade side table made from empty thread spools and crate wood because it was charmingly made. However, it lacked a good surface.  The original white paint over the entire surface hadn’t developed a nice patina, and therefore could not be considered “shabby chic”.  We were going to sell it as is and let the new owner figure out what they wanted to do with it.

But, as it happened we were at coffee break in the workshop one fine winter morning when Jeanine silently looked over at the table for several minutes and then said, “I think I want to do a decorative paint job on that little table. I’ve got an idea for it”.  Jeanine is a talented visual artist in her own right, and had taught art at Beal Art in London, and St. Clair College, so great.  Go for it.  Knock yourself out.

Right after break she set to work by painting the entire table with leaf green oil paint. When that was dry she created a stencil of a leaf and proceeded to paint orange leaves radiating out from the center of the top, and in graceful arches on the lower shelf. Next she highlighted the edges in a buttery yellow and put a potato stamp texture of black on the background.  What followed was a time consuming task of detailing each spool in orange.  This took a while and a steady hand, but when she was finished the piece was transformed.  Finally, when it was thoroughly dry she took 0000 steel wool and gently burnished the oil paint surface to soften the look.   She signed and dated the paint job on the bottom, and we took it an outdoor show we were doing near Collingwood the following weekend.repaint3

It didn’t take long before it was noticed by a vibrant, and well- appointed middle aged woman who went into raptures about it’s “freshness”, and warmth of the design.  She loved it and bought it without hesitation, obviously pleased to be buying from the artist.  It quickly followed that she asked Jeanine if she would be willing to paint other pieces of furniture for her.  She had inherited some pieces from her parents that had sentimental value to her, but did not appeal to her aesthetically.  They were all quite typical turn of the century manufactured maple furniture. Well made, but not particularly interesting.  She explained that she was an interior designer, and wanted the pieces to be transformed into something that would fit in to a modern décor.  Some would go to the cottage. A few others to the house in the city.  She gave Jeanine carte blanche to do as she wish, and urged her to push the limits of her imagination.  Jeanine offered that she would be interested in “riffing” on traditional faux graining techniques, by using traditional tools and techniques, but shifting to a more vibrant palette, and freer organic designs.  An hourly rate was established and it was agreed that she would start on a typical two door, over two drawer sideboard.  But one that at least had quite a free style headboard and side pillars. repaint1We picked the piece up and took it home, and three weeks later we were dropping it off the back of our truck at her home in Toronto.  It was an almost psychedelic sunburst pattern of multi coloured sponge painting.  All free hand, and in a wide range of muted greens, and blues, with highlights in reds and yellows, as was discussed with the client beforehand, and after observing the room it was going into.  We loved the piece, but it was definitely a statement, and we were anxious as to how she would react.  A moment of anticipation as the shipping blanket comes off, and then big smiles all around.  She loves it.  She would have never imagined it, but she loves it.  We were off to the races.repaint2

What followed was several years of regular commissions from the same patron, who collected many pieces herself, and before long had friends and clients looking for something similar.  We never took any pieces of Jeanine’s work to shows, because she was as busy as she wanted to be with commissions, and antique shows of the time, generally frowned upon pieces that have been “repainted”, so we didn’t need the hassle.   She signed and dated all the work not only as recognition, but also to assure that the age of the paint was not misrepresented in the future.

OLYMPUS DIGITAL CAMERA

This rainbow table in vinegar paint is the last piece Jeanine painted, about the year 2000.  Looking over these photos I wish she would do more.

OLYMPUS DIGITAL CAMERA